Getting Started
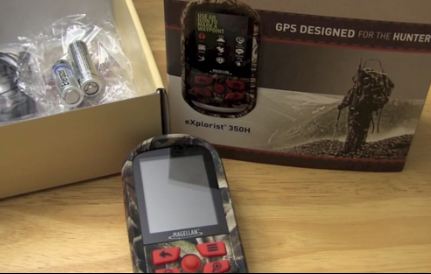
In this video, we will take a look at the Magellan eXplorist 350H. This GPS device is designed specifically for hunters as it strips down the functionality to specifically to that activity.
Taking shape of the eXplorist form factor, the box contains the unit, USB cable, 2 lithium batteries and the manual.The unit itself is straight forward, power button on the top, BACK, MENU, ZOOM IN/OUT & ENTER button in bright blaze orange to contract against the mossy oak cammo pattern.
At the bottom of the unit, you will fing the ISB port and the hard reset switch in case the unit freezes up.
When powering up the unit for the first time, you will need to select the operating language and accept the End User agreement. At this point, it is a good idea to get close to a window or go outside to allow the device to acquire satellite signals and set the date & time. You can during this time, adjust the units, brightness and other features.
How To Reset
In this video we will look at how to reset the Magellan 350H to the default settings or unlock the device.
Lets start with the easy way, which is to reset the unit while it is operational. We go into SETTINGS and MEMORY. From here, press the MENU button to reveal the two options available. For this video, we will select the second item, RESTORE FACTORY DEFAULTS. Press the ENTER BUTTON and press again the confirm your decision.
Once the unit restarts, you will need to select the operating language and agree to the EULA screen. If your device is locked up, a reset typically fixes the problem, but the downside is that you may lose settings and data. Find a paperclip or similar sized item, and reveal the USB port. look to the side if you see a small opening where you can press in gently and restart the device.
Hike Mode
On the Magellan eXplorist 350H, you have the HIKE mode, which you can use when going on hiking trips. You have 3 options once you get into HIKE mode, TRACK ME, MY TRIPS and PLAN TRIP.
TRACK ME is when you want to start recording a track file and enter waypoints using the custom hiking icons provided. You can also enter field notes when creating a waypoint. During this mode you can access the settings or change the map view. A starting and ending waypoint are created automatically.
MY TRIPS lists all saved tracks allowing you to review or lookup the waypoints saved. When you connect the device to your PC or apple computer, you will be able to access the drive and see specific hike folder containing a gpx file for each track or waypoints for each trip.
PLAN TRIP allows you to create a route using waypoints or scrolling on the map.
Hunt Mode
On the Magellan eXplorist 350H, you have the HUNT mode, which you can use when scouting and/or hunting trips. HUNT mode is used to record these situations. You have 3 options once you get into this mode, TRACK ME, MY TRIPS and PLAN TRIP.
TRACK ME is when you want to start recording a track file and enter waypoints using the custom hunting icons provided. You can also enter field notes when creating a waypoint. During this mode you can access the settings or change the map view.
MY TRIPS lists all saved tracks allowing you to review or lookup the waypoints saved. When you connect the device to your PC or apple computer, you will be able to access the drive and see specific hunt folder containing a gpx file for each track or waypoints for each trip.
PLAN TRIP allows you to create a route using waypoints or scrolling on the map.
Hunting Areas
In this video we will look at one hunting specific feature found on the Magellan 350H – which is hunting areas. Now this is known under a variety of names depending on your state or province. For example, Game Management Units, Wildlife Management Districts or simply Deer Hunting Zones. However they all do the same thing: which is to describe the hunting zones for Deer or Moose hunting.
The 350H allows you to view these zones on the device and even alert you if you happen to be crossing one zone into the other. First thing is to actually turn on the Hunting Areas on the map, we do this by going into the SETTINGS and selecting MAPS then MAP SELECTION.
We need to have the MAP OVERLAY setting turned ON. Press ENTER and turn ON HUNTING AREAS. Press the BACK button to get back to the SETTINGS screen.
Now lets go to HUNTING AREAS and select SELECT GMU / WMU AREAS. From here, select the province or state you will be hunting in, and select either DEER or MOOSE. Here we will select DEER. Now we can select specific hunting areas or zones. Here we will turn on Area 102 & Area 103 by pressing the ENTER button.
By default our device will issue a proximity alert when we are within 100ft, but we change it via the other settings, but we’ll leave that as-is. Now, when we return to the MAP screen, we should see the bright green border indicating the Hunting areas. We can quickly find out which areas we are in by using the joystick to move the map cursor and pressing on it twice to reveal the quick info pop-up.
http://novascotia.ca/natr/draws/deerdraw/ddZones.asp http://www.maine.gov/ifw/wildlife/management/wmd/map.htm
Power Settings
In this video we will look at the power related features on the Magellan 350H. Lets start by going into the SETTINGS menu and select POWER.
Here we have three power settings to play with. The first is the Active Suspend timer. We will take a closer look at this in action in a moment, but I recommend this stays at NEVER.
The next setting is the power off timer. This setting will automatically power down the unit after a length of time without a keypress. Depending on your activity, you may need to change this to a longer time span or to NEVER.
The final setting is related to the type of battery used. You can use lithium, alkaline or rechargeable batteries with the 350H. To maximize battery life, we can change the battery profile to match the type of battery you are using.
Now lets look at the Active Suspend feature. This is a good way to prevent unwanted key presses and to extend battery life by turning off the screen. To get to Active Suspend, we simply tap the POWER button and with the display screen we see that we can use select ACTIVE SUSPEND or POWER OFF. Note that we can adjust the brightness of the screen this way also.
The power the unit completely off, we PRESS and HOLD for a few seconds.
Satellite Settings
In this video we will look at the satellite page within the SETTINGS menu. Part of the simplified menu found on the Magellan eXplorist 350H, you have a few pieces of data once you navigate to the page via SETTINGS | SATELLITE
You can view the signal strength, accuracy & number of satellites. You can also view the signal strength via the signal icon found at the top right of the screen. Note that you can’t view the individual satellites or view your current location from the satellite page.
Calendar
In this video, we will look at the calendar on the Magellan eXplorist 350H. To access the calendar we need to navigate from the main menu SETTINGS | CALENDAR. From here we see the calendar month view. Orange highlight indicates the current day, while blue highlight indicates days with hunting or hiking trips stored on our device.
Select a day and press the ENTER / JOYSTICK button to view the details for the selected day. From this screen, you can view hunting times, moon phase, sunrise & sunset. Hit the MENU button to view any hiking or hunting trip.
Press ENTER / JOYSTICK to view the details of the trip and further viewing the waypoint details. For days with multiple trips, you can sort the list by distance, name or delete saved trips.
Volume and Brightness Settings
In this video, we will look at the Volume & Brightness settings found on the Magellan eXplorist 350H. You can access these settings via the menu SETTINGS | VOLUME & BRIGHTNESS.
From this screen you can adjust the screen brightness, by default it is set to the lowest setting. You can also adjust the backlight timer. The final setting is the keypress & alert volume setting. By default this is turned off.