
Last updated: July 26, 2026. The original tutorial and diagrams are preserved. Always verify current magnetic declination for your map and location before navigating.
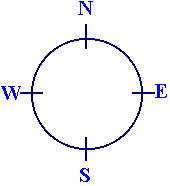
There are several kinds of compasses, one kind to attach to the map, one kind to attach to your thumb. The thumb-compass is used mostly by orienteers who just want to run fast, and this is the kind of compass I normally use.
source: Original content linkUsing the compass alone
This is a very easy lesson, and I would say, not sufficient for those who would like to travel safely in unfamiliar terrain.But not in this tutorial. I would recommend the third kind of compass. Let's take a look at it:
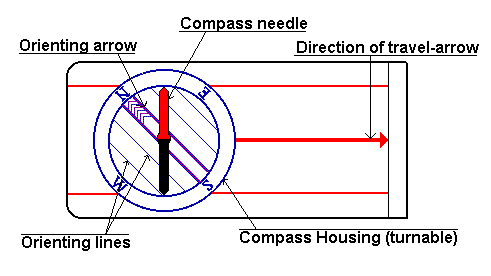
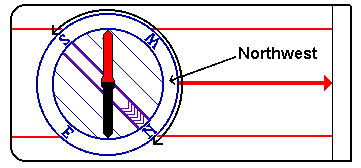
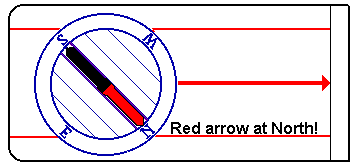
Hold the compass in your hand. And you'll have to hold it quite flat, so that the compass needle can turn. Then turn yourself, your hand, the entire compass, just make sure the compass housing doesn't turn, and turn it until the compass needle is aligned with the lines inside the compass housing.

When you are sure you've got it right, walk off in the direction the direction of travel-arrow is pointing. To avoid getting off the course, make sure to look at the compass quite frequently, say every hundred meters at least. But you shouldn't stare down on the compass. Once you have the direction, aim on some point in the distance, and go there. But this gets more important when you use a map.
There is something you should look for to avoid going in the opposite direction: The Sun. At noon, the sun is roughly in South (or in the north on the southern hemisphere), so if you are heading north and have the sun in your face, it should ring a bell.
When do you need this technique? If you are out there without a map, and you don’t know where you are, but you know that there is a road, trail, stream, river or something long and big you can’t miss if you go in the right direction. And you know in what direction you must go to get there, at least approximately what direction. Then all you need to do, is to turn the compass housing, so that the direction you want to go in, is where the direction of travel-arrow meets the housing. And follow the above steps. But why isn’t this sufficient? It is not very accurate. You are going in the right direction, and you won’t go around in circles, but you’re very lucky if you hit a small spot this way. And that’s why I’m not talking about declination here. And because that is something connected with the use of maps. But if you have a mental image of the map and know what it is, do think about it. But I think you won’t be able to be so accurate so the declination won’t make a difference.If you are taking a long hike in unfamiliar terrain, you should always carry a good map that covers the terrain. Especially if you are leaving the trail. It is in this interaction between the map and a compass, that the compass becomes really valuable.
Using the compass in interaction with a map
This is the important lesson, and you should learn it well. It’s when you use both compass and map the compass is really good, and you will be able to navigate safely and accurately in terrain you’ve never been before without following trails. But it’ll take some training and experience, though.
I am not covering map reading here, guess you would have to consult other sources for that, but the lesson will be useful if you have a sense of what a map says.
- Align the edge of the compass with the starting and finishing point.
- Rotate the compass housing until the orienting arrow and lines point N on the map.
- Rotate the map and compass together until the red end of the compass needle points north.
- Follow the direction of travel arrow on the compass, keeping the needle aligned with the orienting arrow on the housing.
Here is our compass again:
You are using the map to tell you which way is correct instead of your intuition.
Take a map. In our first example, we look at a map made for orienteering, and it is very detailed. Well, not really. We look at a fictitious map I drew myself, but never mind. To the point.
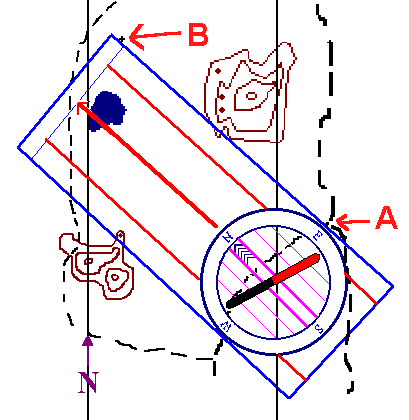
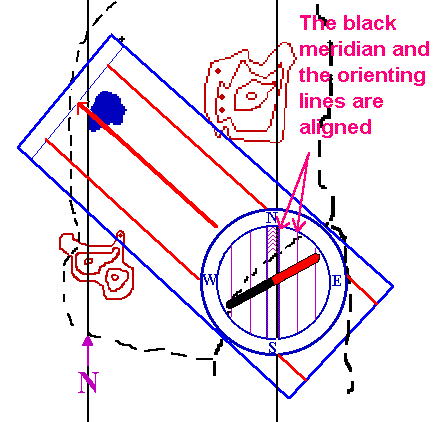
Keep the compass steady on the map. What you are going to do next is that you are going to align the orienting lines and the orienting arrow with the meridian lines of the map. The lines on the map going north, that is. While you have the edge of the compass carefully aligned from A to B, turn the compass housing so that the orienting lines in the compass housing are aligned with the meridian lines on the map. During this process, you don't mind what happens to the compass needle.
Hold the compass in your hand. And now you'll have to hold it quite flat, so that the compass needle can turn. Then turn yourself, your hand, the entire compass, just make sure the compass housing doesn't turn, and turn it until the compass needle is aligned with the lines inside the compass housing.
It's time to walk off. But to do that with optimal accuracy, you'll have to do that in a special way as well. Hold the compass in your hand, with the needle well aligned with the orienting arrow.
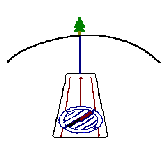
Then aim, as careful as you can, in the direction the direction of travel-arrow is pointing. Fix your eye on some special feature in the terrain as far as you can see in the direction. Then go there. Be sure as you go that the compass housing doesn't turn. If you're in a dense forest, you might need to aim several times. Hopefully, you will reach your target B when you do this.
At this time, you may want to go out and do some training.
Unfortunately, sometimes, for some quite often, it is even more complicated. There is something called magnetic declination. And then, for hiking, you wouldn’t use orienteering maps.Magnetic Declination
Unfortunately, sometimes, for some quite often, it is even more complicated. There is something called magnetic declination. You see, the compass is pointing towards the magnetic northpole, and the map is pointing toward s the geographic northpole, and that is not the same place.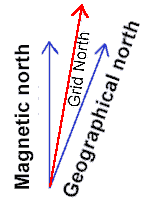
When you are taking out a course,
but this time, you must also look out so that you don't align the orienting lines with the grid lines pointing west or east, or south for that matter. When you have taken out a course like you've learned, you must add or subract an angle, and that angle is the angle you found before you left home, the angle between the grid lines or meridians and the magnetic north.
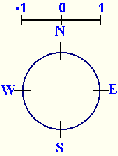
You may not need to find the declination before you leave home, actually. There is a fast and pretty good method to find the declination whereever you are. This method has also the advantage that corrects for local conditions that may be present (I am thankful towards Jim Cross who pointed this out to me). This is what you do:
- Determine by map inspection the grid azimuth from your location to a know, visible, distant point. The further away, the more accurate it gets. This means you have to know where you are, and be pretty sure about one other feature in the terrain.
- Sight on that distant point with the compass and note the magnetic azimuth. You do that by turning the compass housing so that it is aligned with the needle. You may now read the number from the housing where it meets the base of the direction of travel-arrow.
- Compare the two azimuths. The difference is the declination.
- Update as necessary. You shouldn’t need to do this very often, unless you travel in a terrain with lots of mineral deposits.
There are a few riddles and rhymes to help you remember whether you should add or subtract. I don't know them. If you live in an area where you don't go far for it to change between east and west, it is so small you wouldn't need to worry about it anyway. So it's best to just remember whether you should add or subtract.
Uncertainty
You can't always expect to hit exactly what you are looking for. In fact, you must expect to get a little off course.
How much you get off course depends very often on the things around you. How dense the forest is, fog, visibility is a keyword. And of course, it depends on how accurate you are. You do make things better by being careful when you take out a course, and it is important to aim as far ahead as you can see.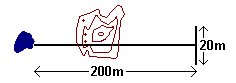
In normal forest conditions we say that as a rule of thumb, the uncertainty is one tenth of the distance traveled. So if it is like in the figure, you go 200 meters on course, it is possible that you end up a little off course, 20 meters or so. If you're looking for something smaller than 20 meters across, there is a chance you'll miss. If you want to hit that rock in our example you'll need to keep the eyes open!
In the open mountain areas, things are of course a lot easier when you can see far ahead of you.
This was the last of the lessons you should know. But more lessons are upcoming. Now it is time to log out and get into the backyard, and then backcountry. Try it out! That is after all, the only way to learn this properly. Good Luck!I said navigating in the mountains is easier. Well that is until the fog comes. Fog can make orienteering in the mountains and in the forest extremely difficult, and therefore, it can also be dangerous to the unexperienced.
How to navigate in foggy conditions
Fog makes things difficult, and in some situations dangerous. When you hike, you will probably some day experience these difficulties, and you’d better be prepared.
The fog can come creeping very fast. I have myself experienced from clear view to dense fog in 10 seconds. How fast this goes, depends on where you are.
In normal summer conditions without snow, it is often not much of a problem. Unless you are supposed to find a hut or something. The ground provides normally so much contrast, you could do the aiming I have written about in lesson 2. Just be very careful and accurate. Perhaps you also might use some of the advice given later. Winter conditions can make things a lot worse, when there is snow on the ground. The fog is white (or grey), the snow is also white. You may get a condition we call a “white-out”. It’s too late to read the terrain, and then the map isn’t of much use. You can’t see anything anyway. You have no choice but to put blind faith in your compass. I hope you knew where you were, because you need to take out a good compass course, like described in the other lessons.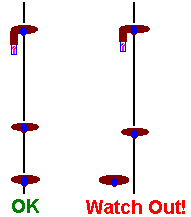
If you are three persons in a row, like on the figure, and the last one carries a compass (of course, it is better that all three carry a compass, but the last one has command), he or she will see if you get off course because one of those in front of him or her will not be covered by the person in front. On the figure, the situation to the left is ok. The person on top is heading forward and but he sees only the person in front of him or her. In the situation to the right, it's time to stop. The last person can see the backs of both of them in front, and they are about to leave their course.
The further apart you go, the more accurate this method is, but it is also very important to have good contact. Sometimes the conditions get so bad there is no way to maintain contact, and then, the method may fail.
There is also another method for two people, where the lead person goes out on a compass azimuth, as far as the visibility will allow. The person behind stands still and watches the lead person, telling them if they are in the correct line or not. Once they have moved correctly into line they then stand still and the back person joins them. They then have their turn to move out ahead on the azimuth, and the whole cycle repeats. The problem with this method is when the visibility is very bad, the lead person can't go more that a few meters, and it would be dangerous to loose each other.
Finally, I’d like to comment on something that is seen in many standard texts on mountaineering navigation: You are commonly taught to use methods that use terrain features that are easily recognizable but far away. In my opinion, such methods are of little use, unless you require surveyor’s accuracy in knowing where you are (hikers rarely do). As long as the weather is good, navigation is fairly easy and you’ll naturally use these features as part of a more general approach. However, when the visibility is poor, you can’t see these far-away-features and this makes the methods involving them rather useless. Therefore, focus your training in navigation on using features in your vicinity.Current References
- Natural Resources Canada: Compass bearings
- Natural Resources Canada: Orienting a topographic map
- Natural Resources Canada: Magnetic declination