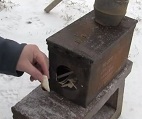
In this video, I show you what I’ve been testing for our winter camping excursion and how my ammo wood can stove worked.
Getting Started
I used a standard 50 cal ammo can and 4 inch heating duct pipe to act as stove and chimney. Since I have no workshop to work in, I used a simple Dremel tool to do the cutting to remove the handle and to cur a hole on the side & top of the can.
I used a cheap brass door hinge and a few rivets to attach the piece I cut from the side to act as a door.
For the chimney, I bought the smaller bits pf pipe I could find, but I would recommend finding a 2 or 3 inch pipe.
The Purpose
We wanted to do “hot tenting” or winter camping using a canvas shelter and the wood stove as a heat source. I also wanted to try cooking on it. I tried chicken a la king and warmed up some irish stew with my zebra pot.
The Outcome
I found the cooking surface to be small and might take a little longer warming up foods or water with it.
The fuel I used ranged from spruce to hardwood and compressed saw dust logs. I found that wood worked better, but the size of the ammo can made it so you had to re-stock it fairly often.
A field test was done after shooting this video and the results were promising where it had warmed up our shelter area (10 feet x 10 feet) by seven degrees. Again, the downside is tending to the stove often as the wood pieces were a bit small to leave. Also we didn’t have anything to slow down the burn.

